

Materials
What you need for TUESDAY:
For each camper:
Plastic jewelry bag
2 ft piece of yarn or string
Two cotton balls
2 corn seeds
water
To share:
3 plastic 4 oz cups
3 plastic 9 oz cups
Two peat pellets
3 – 6 in pieces of cotton or polyester clothes line OR 6 in strips of felt
6 Wisconsin Fast Plant Seeds
9 Fertilizer Pellets
6 Toothpicks
Water
3 sandwich baggies
A location directly below a light source
Ruler
Optional: for making a “time lapse” station
Paper
Markers
Tape
Introduction
Objectives:
You will set up short-term observations of seed germination.
You will build a self-watering growth system.
You will plant and grow Brassica rapa Wisconsin Fast Plants in order to observe the entire life cycle of a plant.
Time Required:
Part 1: 30 minutes
Part 2: 20-30 minutes
Part 3: 20 minutes (extra time to set up a time lapse station)
Part 4: 10-15 minutes every other day for approximately 40 days.
These estimations may be longer depending on the age of campers.
Remember to take pictures of your plant growth so that you can share them!
If you are inclined, you can set up a “time lapse station” for the life cycle of your plant and take daily pictures of your plants. At the end you can make a movie from the photos!
Age Range:
Part 1: Grades 3-6 with guidance; Grades 7-8 independently
Part 2: Grades 3-6 with guidance; Grades 7-8 independently
If setting up THREE chambers seems to be too excessive, try setting up only TWO chambers: No fertilizer pellets and 3 fertilizer pellets.
Part 3: Daily monitoring will initially require guidance for all, but may become independent with practice.
Background Reading
Excerpted from “Bean Beginnings” (©2011 Ball Horticultural Company and W. Atlee Burpee Company) and Wisconsin Fast Plants at fastplants.org
Plants are nearly everywhere. You can walk through a forest, drive down a road, view fields planted with crops for food, even explore a city park that is lined with trees or weeds poking through cracks in the sidewalk. Plants come in all different sizes and shapes and they grow in a variety of environments from the cold North to the heat of the Tropics. Scientists estimate that at least 260,000 different species of plants live on Earth today.
Plants are living organisms. Living organisms have life cycles. The first part of the life cycle is the seed. A seed may not appear to be alive, but it is a small embryonic plant covered by a seed coat. Plants that have seeds are found in a variety of climates and conditions. A typical seed has three basic parts: an embryo, the seed coat and a temporary food supply. The food supply is packed inside the seed coat and wraps around the embryo. The embryo is a “baby” plant. It will develop, under the right conditions, into a new plant. Have you ever watched a seed grow?
In this activity, you will be able to set up the germination of corn seeds so that you can watch them grow in their first few days. During these first few days, the seeds use up the food supply in the seed.
Once leaves emerge from the seed, plants begin making their own food through a process called photosynthesis, using energy from the sun and matter from the air and water. Plants also use nutrients that they obtain from the soil to live. If you have ever added fertilizer to a houseplant or garden, then you were adding nutrients to help a plant. If nutrients are used by plants to help plants be healthier, are more nutrients better? If you want a plant to be really healthy, should you add all the fertilizer you can to its soil?
Farmers face this question each growing season. If farmers double the amount of fertilizer normally applied to their crops, will the yield be increased enough to cover the costs of the additional fertilizer? Fertilizer is expensive, and using too much will cost too much. In addition, putting too much fertilizer on plants may hurt the environment. If the plant does not use all of the fertilizer then the extra nutrients are washed into lakes. This causes algae to grow too fast and may kill animals that live in the water. On the other hand, under-fertilized plants may not grow well and the farm may not have enough crops to remain in business.
Choosing the best amount of fertilizer to apply to crops is a critical decision that farmers and gardeners must make. Using fertilizer pellets provides nitrogen (N), phosphorus (P) and potassium (K). Too few pellets produce shorter plants with pale yellow or reddish leaves and few flowers. Using too many fertilizer pellets produces taller plants with more leaves and more branching and slightly delayed flower production. Adding even more pellets can poison the soil and cause severely stunted plants or death due to the build-up of salt in the soil. Plants will produce a maximum yield of seed under optimal (best) fertilizer levels.
In this investigation, you will be able to investigate the amount of fertilizer that is best for plant growth and observe the complete life cycle of your plant. Notes on Fertilizer and Nutrients: (From: Wisconsin Fast Plants https://fastplants.org/)
Plants require an array of nutrients for growth, repair, and proper function. A nutrient is considered essential to growth if the plant cannot complete its life cycle without it, and the nutrient forms part of any critical molecule or constituent of the plant. Though micronutrients are important to healthy plant growth and function, the major nutrients needed by Wisconsin Fast Plants™ are nitrogen (N), phosphorus (P), and potassium (K).
- Nitrogen A – component of amino acids, proteins, nucleic acids, and chlorophyll.
- Optimum: Plants are rich green and protein content increases.
- Deficient: Plants are stunted and light green in color; lower leaves are yellow, stem is slender.
- Excessive: Plants have very lush foliage with sappy, soft stems; flowering is delayed.
- Phosphorus A – component of the energy-mediating compounds ADP and ATP, nucleic acids, and phospholipids.
- Optimum: P stimulates root formation and growth, giving the plants a vigorous start; P also stimulates flowering and aids in seed formation.
- Deficient: Plants have slower growth and delayed flower and pod development; leaves are dark green and dull; root system is poor with little branching; stem is slender.
- Excessive: Plants have very lush foliage with sappy, soft stems; flowering is delayed.
- Potassium – Involved in protein synthesis and in the opening and closing of stomata; essential to the formation and translocation of starches and sugars.
- Optimum: K imparts increased vigor and disease resistance.
- Deficient: Leaves can be mottled or chlorotic; small necrotic spots may appear between veins or near leaf tips and margins; flowers do not achieve vibrant yellow color; stem is slender.
- Excessive: Plants have dark foliage and stiff stems and leaf branches.
Plant Life Cycle – Life Science Investigation
Adapted from “Bean Beginnings” (©2011 Ball Horticultural Company and W. Atlee Burpee Company) and Wisconsin Fast Plants at fastplants.org
EXPLORE: Make a Germination Necklace
Materials:
For each camper:
Plastic jewelry bag
2 ft piece of yarn or string
Two cotton balls
2 corn seeds
Water
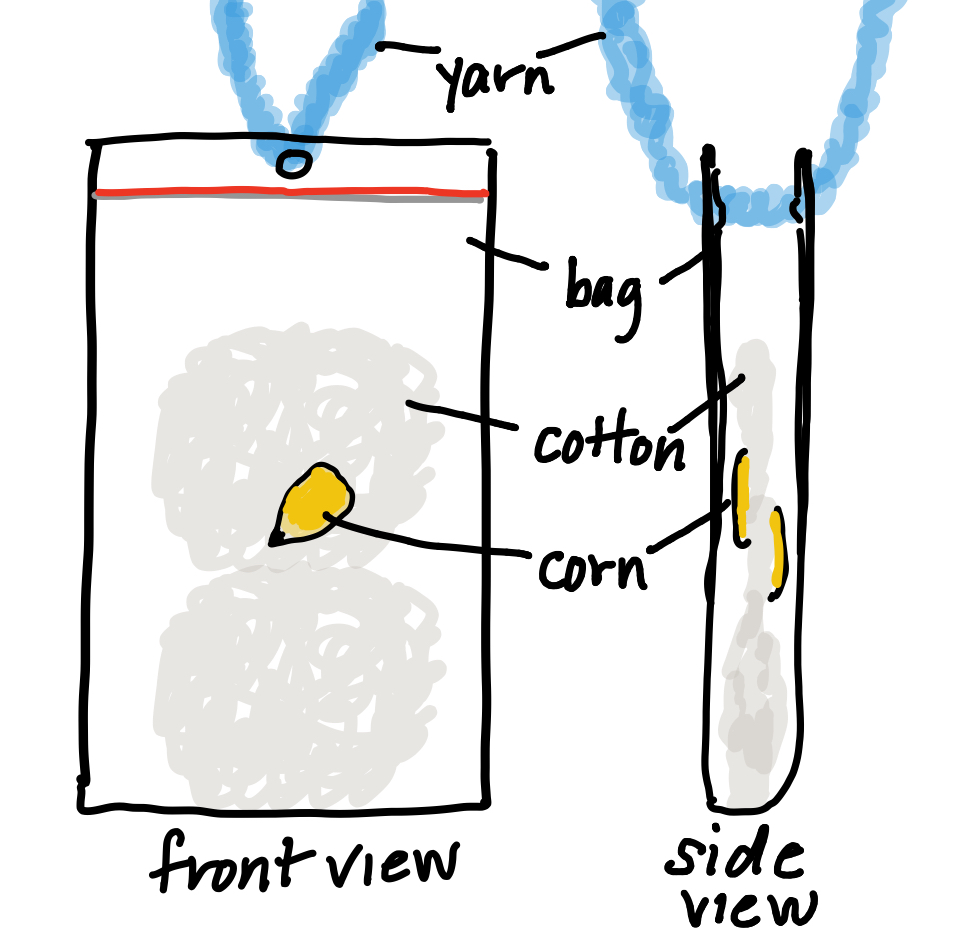
Seeds will develop, under the right conditions, into a new plant. Have you ever watched a seed grow? We are going to create a live corn necklace, which you will care for and observe as it grows. If you want to, you can use two corn varieties—so that you can observe and compare them as they germinate.
- You should have two corn seeds. Get one plastic “jewelry” bag, two cotton balls, a piece of yarn or string, and a cup of water.
- Dip the two cotton balls in the water so that they are completely wet but not dripping wet. Too much water will keep the seeds from germinating (sprouting), because the conditions will not be right!
- Place the cotton balls in the plastic bag. Make sure that the cotton fills up the plastic bag almost to the top.
- Place one corn seed on one side of the cotton ball so that it is held in place between the plastic and the cotton ball about halfway up the bag.
- Place the second corn seed on the other side of the cotton ball so that it is held in place between the plastic and the cotton ball about halfway up the bag.
- Seal the bag so that there is air in the bag, but that it is not blown up like a balloon.
- Create a small hole in the bag ABOVE the seal. String the yarn through the hole in the jewelry bag. Tie a knot in the end of the string to form a necklace.
- The necklace can be worn inside your shirt so that your body heat will keep the seeds warm. You can hang it someplace else, but it will grow much more slowly.
Keeping Track of the Germination of Your Seeds
- Each day, at about the same time, use a ruler to measure the length of roots and leaves as they grow.
- Make yourself a data chart (link above). Observe, measure, and collect data on the corn plant germination and growth for at least a week.
- Once you see growth of the root or the shoot (leaves), use your ruler to measure the length in millimeters (mm). This is the smallest unit on the metric side of your ruler.
- It may be difficult to take the seedlings out of the bags and then put them back in without breaking the roots. To prevent the breakage of roots, measure the roots through the bag instead.
- The roots will curl, so you may need to measure them in sections, add the lengths of the sections, and then estimate the total length.
- Make observations about the seed everyday. Are you seeing fuzz? Has the seed coat cracked? Has it been pushed off? Are the shoots green?
- It is possible that the cotton ball may become dry. If so, add a little more water to wet the cotton ball, but do not add so much that there is excess water in the bag, and seal it securely.
- At the end of the week, you can plant your corn in a pot of soil and put it outside. If you care for it by watering and fertilizing, the plant will continue to grow and it may produce a cob of corn!
Build: Self-Watering Growth Chamber
Materials to share:
3 plastic 4oz cups
3 plastic 9 oz cups
Two peat pellets
3 – 6 in pieces of cotton or polyester clothes line OR 6 in strips of felt
6 Wisconsin Fast Plant Seeds
6 toothpicks
9 Fertilizer Pellets
Bowl of Water
3 sandwich baggies
A location directly below a light source
Ruler
Optional: For making a “time lapse” station
Paper
Markers
Tape
When you set up this controlled scientific experiment, you will be able to investigate the amount of fertilizer that is best for plant growth and observe the complete life cycle of your plant. If setting up THREE chambers seems to be excessive, try setting up only TWO chambers: No fertilizer pellets and 3 fertilizer pellets.
Procedure:
- Fill a medium sized bowl with water. Place the two peat pellets into the water. They will begin to expand. Leave them for 5-10 minutes. Place the three 6-inch pieces of clothesline (or felt strips) into the bowl of water to soak.
Mark the Water Reservoir
- Find the three 9oz plastic cups. These cups will be your water reservoirs. Put your ruler into the cup and measure 3cm from the bottom of the cup. Use a sharpie to make a mark. This is your waterline. Do the same thing in the other two cups.
- Fill each of the three cups to the water line that you just made. Set them off to the side and out of the way.
Making the Growth Cups
- Find the three 4oz cups. These will be the growth cups. Label one cup “No Fertilizer.” Label the second cup “3 Fertilizer.” Label the third cup “6 fertilizer”.
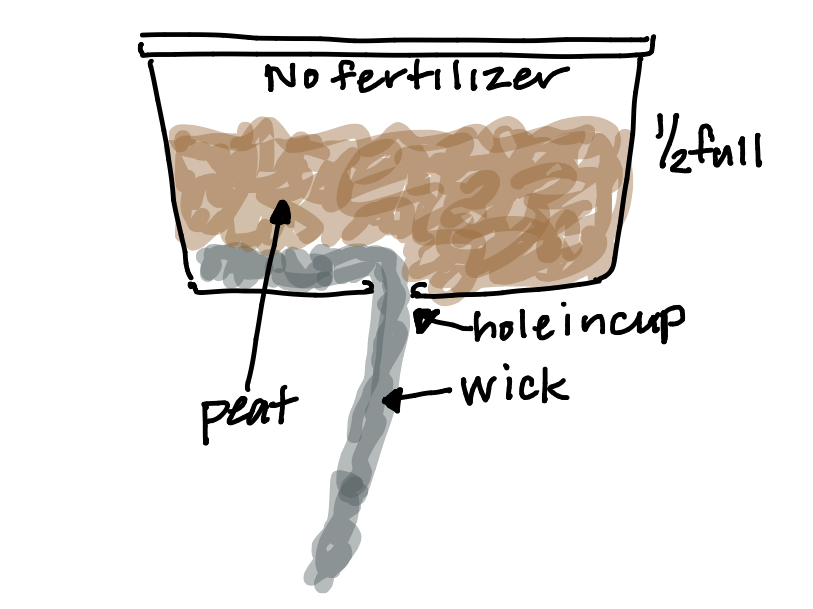
- Use a push pin to make a hole on the bottom of each 4oz plastic cup. Again, be patient. You do not want to split the cup. This hole will need to be made bigger so that it is wide enough that you will be able to thread the cotton clothesline (or felt strip) through it. Gently move the push pins to make a bigger hole.
- Find your three 6-inch sections of clothesline or felt strips. This is called the wick. It will be used to draw the water up from the water reservoir.
- Thread the wick through the hole on the bottom of each cup so that half of the wick is in the cup and half is hanging out of the cup. Leave the wick in place. You may need to adjust the size of the hole. If the wick slips out of the cup, you might need to temporarily tape it in place.
- Fit the 4oz cup into the top of the 9oz water reservoir. The wick should be hanging into the water. If the wick does not touch the water, you will need to adjust it so that it does.
Investigate: Is more fertilizer better for Wisconsin Fast Plants?
Setting up the Growth Cups
- The peat pellets should be completely expanded. Take them out of the water and place them on a paper towel or a plate. Open the pellets by using your scissors to cut the casing.
- Divide the peat from one of the pellets into each growth cup. Your wick should now be under the peat as you can see in the diagram.
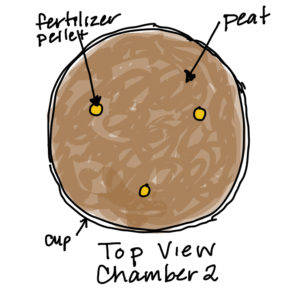
Adding the Fertilizer
- Find the fertilizer pellets.
- Put fertilizer pellets on top of the dirt based on the label you put on your cup. Do not put any pellets in the cup for “No Fertilizer.” Put three pellets in the “3 Fertilizer” cup. Put 6 fertilizer pellets in the “6 Fertilizer” cup.
- Use the peat from the second peat pellet to fill up the 3 growth cups. Make sure that all three cups have the same amount of peat.
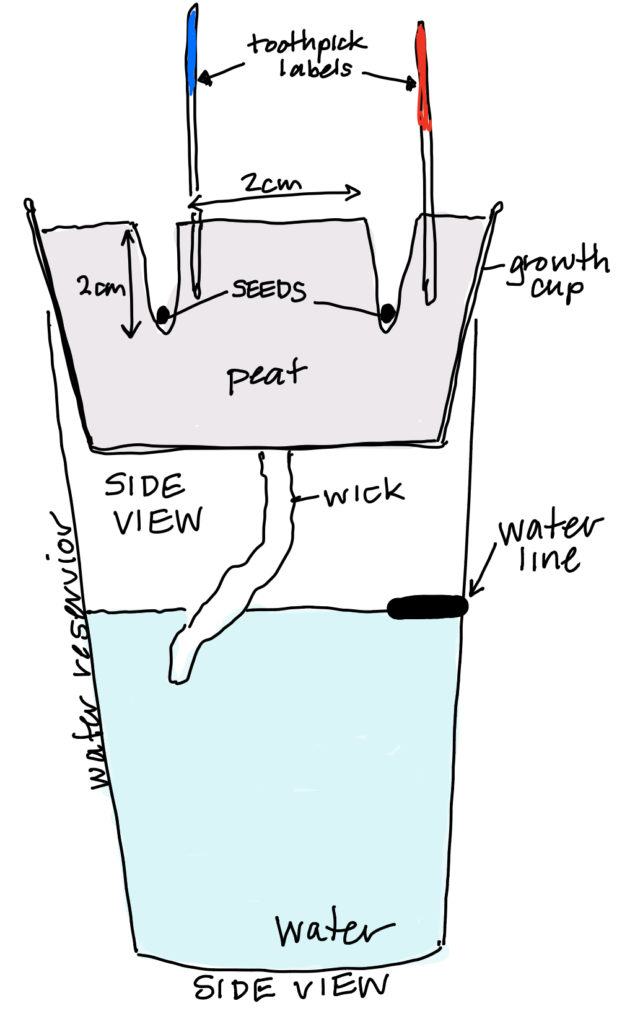
Planting the Seeds
- You should have 6 toothpicks. Use your markers to color the top of each toothpick a different color. This is how we will be keeping track of which plant is which.
- You will be planting two seeds in each container. Use your toothpick to make two holes that are 2 cm deep in the peat. The holes should be at least 2 cm apart from one another.
- Drop one seed in each hole. Cover them lightly with peat. Mark the location by pushing a toothpick into the soil next to the seed.
- Plant two seeds in each growth cup.
- Use a plastic sandwich bag to cover the cups, creating a mini-greenhouse. Place the three growth chambers under a light source. It will help growth if this is a warm area.
NOTE: These plants need to remain indoors for the duration of their life cycle. When plants are moved from indoors to outdoors, they experience “shock” that could damage or kill them. For this experiment, put your growth chambers in the light near a window or under a light source.
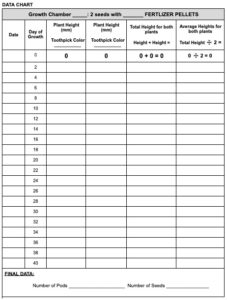
Tracking the data: Is more fertilizer better for Wisconsin Fast Plants?
You will need to make a data chart for each growth chamber.
Caring for your plant and Measuring Height EVERY TWO DAYS:
Plants take time to grow, so we will need to be patient, although Fast Plants (Brassica rapa) grows quickly, so we will be able to take data on a regular basis.
- You will be watering and measuring the height of your plants in each chamber every two days.
- To water, add 10ml (1Tbsp) of water to each chamber. You will also need to make sure that the water reservoir has water up to the line you drew inside the cup.
- To measure height, you will need to use a metric ruler.
- You will be measuring the plant from the level of the soil to the top of the plant. If your ruler has a border at the zero end, you may need to push your ruler into the soil so that the zero lines up with the soil level.
- You will be measuring height in mm for each plant and record the measurement on your chart.
- You will need to calculate the average for the two plants in each system.
- Plant 1 Height + Plant 2 Height = Total Height
- Total Height ➗ 2 = Average Height
- Record the average on your chart.
SAMPLE
Extension: Make a time lapse station
Set up a background paper someplace that you can leave undisturbed.
Place another sheet of paper or a piece of tape on the surface where you will be placing your growth chamber.
You will need to also make a mark on the cup so that you can always place the cup in the same position.
Each day (or every other day) place your cup in the station and take a picture of it.
Put the pictures together using a free app like LapseIt to make a movie!
Share it with us on the Facebook Page!
Pollinating Flowers
At some point, a healthy plant will make a yellow flower. When your plant makes a flower, it needs to be pollinated in order to make seeds. If your plant was outside, insects (like bees) would do this for the plant. Our plants are inside, so you will need to be the pollinator.
- You will need one or two cotton swabs to use as a pollination stick.
- Very gently and in a circle, rub the tip of the cotton swab in the center of the flower. This will pick up the pollen. You may see the yellow pollen on the tip of the cotton swab.
- Using the same swab, rub the pollen in the same way on another flower.
- Continue using the same swab on the rest of the flowers, even if they are on other plants.
- Store the cotton swab in a plastic bag or cup to use anytime you see new flowers.
Opening Pods and Counting Seeds
Eventually, the pollinated flowers will make seeds. On the Brassica rapa plant, the seeds are contained in pods. As the seeds mature, the pods will thicken and elongate. The number of seeds produced by a plant will tell us how successful the plant has been over its 40 Day life cycle.
- On Day 30, allow the plants to dry out. When plant and pods are brown and crispy, they are ready to harvest! Start by removing all of the pods from the plants in your first growth chamber.
- Put the pod on a plate or paper towel so that they do not roll away.
- Use your fingernails to pry open the pods and reveal the seeds.
- Count the number of seeds produced and record it on your data chart.
- Repeat this process for each growth chamber.
Conclusions:
Which of your plants was most successful?
Which amount of fertilizer had the plants with the biggest height and largest number of seeds?
What Happened?
Why did we need to set up three different growth chambers?
Whenever we do a science experiment, we follow certain steps to make sure that the experiment will be fair and that it will test what we want it to test. For example: We did an experiment to test how much fertilizer will make our plants grow taller. We wanted to make sure that our results were just from the amount of fertilizer and not from some other factor.
When we tested the effect of fertilizer on our seeds, we grew a bunch of plants and put different amounts of fertilizer on them. The amount fertilizer is our manipulated variable. All other variables, (amount of watering, location, pot size, seed size) would remain the same and we’d call them constants. They have to stay the same for the experiment to be a fair and accurate test. You can imagine what would happen if we put some of the plants in a closet and the others in the window. The plants in the closet would all die and we’d conclude that it was the amount of fertilizer that killed plants. The responding variable in this experiment was plant growth in centimeters. This variable is what we want to observe and record.
When we do experiments it’s a good idea to do multiple trials, that is, do the same experiment lots of times. When we do multiple trials of the same experiment, we can make sure that our results are consistent and not altered by random events. Multiple trials can be done at one time. This is why we grew two seeds in each growth chamber.
What about the fertilizer?
Just like people, plants need nutrients to grow. In a typical fertilizer, you’ll find lots of nitrogen, phosphorus, and potassium. These primary nutrients help plants grow new cells, and many enable different growth and food production processes to happen. If you choose a good quality fertilizer, it will also contain many other nutrients, including secondary nutrients like calcium, magnesium, and sulfur. Calcium helps plants grow roots and stand up straight. Magnesium helps plants make chlorophyll, which helps plants make food through photosynthesis. Sulfur is an important part of different proteins and plants enzymes. Plants also need very tiny amounts of trace elements like boron, copper, iron, chloride, manganese, molybdenum, and zinc as well.
When we fertilize plants, regular watering is necessary. The water holds tiny pieces of fertilizer in suspension in the water. The water helps the fertilizer to move through the soil to the seed. It also helps the plant move nutrients around.
Think about it this way: the water in our bodies helps us move nutrients around, and same goes for plants. Plants need water to move nutrients from the soil into the plant. Osmosis is a process in which nutrients move from areas of low concentration to areas of high concentration. This process allows nutrients to move from the soil into the center of a plant’s roots where there are more nutrients.
Once the water and nutrients are inside the xylem tissue of the plant, the xylem acts as a tube that sends the water and nutrients up into the stem. The water molecules connect to each other through a process called adhesion, and as molecules cling together, they move up through the plant. The water becomes a long, cohesive column, and as water moves out of the plant’s leaves when the plant transpires, a new batch of nutrient-carrying water moves upwards.
Water and fertilizer go hand in hand. Allowing nutrients to move through the soil in suspension helps those nutrients move more easily, and it also helps the plant use those nutrients to grow.