
Materials
What you need for WEDNESDAY:
For each camper:
2 ft of copper tape
1 lithium battery
Set of three LED stickers
Toilet paper tube or paper towel tube
2 AA batteries
Battery holder
Two 1 ft pieces of insulated copper wire
1 holiday light with end stripped
1 plastic or paper cup (recommend 9oz)
2 brass brads
Clear acetate sheet or sheet protector
To share:
Markers
Construction paper
Duct tape
Aluminum foil
Roll of electrical tape
Scissors
Utility knife (For use ONLY with adult supervision)
Paper clips
Introduction
Objectives:
To build and test a simple circuit using copper tape, LED stick on lights, and a battery.
To build a simple circuit to make a working flashlight.
To build a switch control the flow of electricity in your flashlight
Time Required:
Part 1: 20-30 minutes
Part 2: 40 minutes
Part 3: 20 minutes
Age Range:
Part 1: Grades 3-6 with guidance; Grades 7-8 independently
Part 2: Grades 3-8 with guidance
Part 3: Grades 3-8 with guidance
Background Reading
ELECTRICITY
What do TVs, cell phones, light bulbs, and even cars have in common? They are just a few things we use everyday that require electricity. In this technological age, it’s become nearly impossible to get through a day without electricity. Scientists have studied electricity for hundreds of years. But it was not until the early 1800s that they learned how to create a continuous flow of electricity and then to channel that electricity through the use of a circuit.
CIRCUIT
But how does the electricity get to where we need it? Electricity, which is a type of energy, flows on a circuit. A circuit is a complete path around which electricity can flow. When electric current flows, it can be used by electrical appliances, such as light bulbs. An electric circuit has to have a power source, wires for the electricity to flow through, and a device such as a lamp or a motor that uses the electric current. All three of these parts must be connected so that the current continues to flow.
- POWER: In small portable devices such as flashlights, a battery supplies the power. In a home or school most devices take power from the electricity supplied by the public power plant. Current moves around the circuit from the positive terminal of a battery, to the negative terminal.
- CONDUCTOR: Wires made of metal and covered in plastic carry the electricity around the circuit. Materials that allow electric current to flow through them easily are called conductors. Metal is a good conductor of electricity, which means it can pass along the wire easily and well. The plastic around the wire insulates the electricity. The electricity is very powerful, and the plastic keeps it contained so that it does not harm people or other objects.
- DEVICE: A device, like a bulb or a motor, will utilize the current to do some work. For instance, a bulb will use the electricity to generate light. A motor will use the electrical current to spin and move a mixer or blender in the kitchen.
OPEN AND CLOSED CIRCUITS
For a circuit to work, all of its parts must be connected. When all of the parts are connected, the circuit is closed and current moves freely. If the circuit is complete, it is called CLOSED. In a closed circuit, electric current can flow and the device will receive power and will work.
When a part is not connected, the circuit is OPEN and the current stops. If the path is broken, the current stops and the device will not work. Electric circuits often have switches that allow people to control the flow of the electric current through the circuit. Flipping on a lamp switch closes its circuit. This allows current to flow freely and the lamp to light up. Turning off the switch breaks, or opens, the circuit—the flow of current stops and the lamp shuts off.
Procedure
Part A: EXPLORE: Making a simple circuit that WORKS!
What is a circuit?
A circuit is a complete path around which electricity can flow. An electric circuit has to have a power source, a conductor for the electricity to flow through, and a device, such as a light, that uses the electric current.
We are going to create a circuit to light an LED. Our battery will be connected to the LED using copper tape and the LED will be connected back to the battery using a second piece of copper tape. Electricity only flows in loops. Your copper tape is made of metal so it is a great conductor of electricity. This flow of electricity, called current, will cause the LED light to turn on and shine.
Here’s what each camper will need:
2 ft of copper tape (conductor)
1 lithium battery (power)
Set of three LED stickers (device)
Here’s what you will share:
Markers
Construction paper
Scissors
Procedure:
- Turn to the template on your Engineering worksheet. We will be using the corner of the worksheet, so you may need to turn your page upside down to build your circuit.
- Locate the two gray lines on your template. Measure and cut two pieces of copper tape to match the length of the gray lines.
- Peel the sticker off the tape and stick the foil tape over the gray lines on the template. Both pieces of copper tape must remain intact. When turning corners, you should fold the tape rather than cut it. A connection works best when made with a continuous strip of tape.
- Stick the LED sticker onto the foil, over the picture on the template.
- Fold the page corner along the dotted line and place the battery “+” side up over the “-” circle.
- Fold the corner flap over so that the foil on the red circle touches the “+” of the battery. The light should turn on!!!
Extension:
You have leftover copper tape and two additional LED lights. Design a NEW simple circuit pattern that will also light an LED. You can make it look like a heart, or a butterfly or a robot. You could use construction paper to make a card and make the card light up!
There are some great ideas and templates at https://chibitronics.com/educators/ as well as some kits that would help you to learn more about circuits and programming circuits to do other tasks.
POST PICTURES OF YOUR WORKING CIRCUIT AND/OR THE CIRCUIT PATTERN OF YOUR OWN DESIGN ON THE FACEBOOK PAGE TO SHARE!
Part B: BUILD: Making a simple circuit flashlight
What can we make with a simple circuit?
A FLASHLIGHT!!!
Remember that a simple circuit is just a complete path around which electricity can flow. If you look inside a flashlight, it has batteries as a power source, copper wiring as the conductor for the electricity to flow through, and a bulb as the device that uses the electric current to light up.
Since you already know how to make a circuit that lights an LED, let’s put that knowledge to use to transfer our simple circuit into a tube!
In this case, you will be following a set of “blueprints” to build your simple flashlight. You will need to look at the diagram to help you to assemble your flashlight. You may use the order suggested below, OR you can build it in your own order, OR you can use the basic design, but make it in your own way.
Here’s what each camper will need:
Toilet paper tube or paper towel tube
2 AA batteries
Battery holder
Two 1 ft pieces of insulated copper wire
1 holiday light with end stripped
1 plastic cup
Clear acetate sheet or sheet protector
Here’s what you will share:
Markers
Construction paper
Duct tape
Aluminum foil
Roll of electrical tape
Scissors
Utility knife (ADULTS ONLY)
Paper clips
Suggested Order:
- Make your simple circuit first.
- Attach one wire to one side of the light bulb by twisting the copper wires together.
- Use a piece of black electrical tape to cover the exposed wire.
- Repeat on the other side of the light bulb with the second wire. Cover with tape.
- Take the other end of one of the wires and attach it to a wire that is attached to the battery holder by twisting the copper wires together. If you do not have enough copper wire exposed, you may need to peel off some of the plastic.
- Use a piece of black electrical tape to cover the exposed wire.
- Repeat on the other side of the battery holder with the second wire. Cover with electrical tape.
- You should now be able to SEE a complete circuit, even though it is not lighting up.
- Test the circuit by putting the batteries in the battery holder. If it lights, you have made a closed circuit! Congratulations! Now take the battery out so that we do not drain it while we build the rest of the flashlight.
- If it does not light up, it means you have an open circuit. Open circuits do not light! This is where you will need to TINKER. Check each of your junctions (where the wires are twisted together). Make sure that the copper is touching the copper so that the electricity will flow. Play with your materials until you can get the bulb to light. And don’t give up! It may take some patience to get it to work
- Once you know the circuit works, remove the batteries.
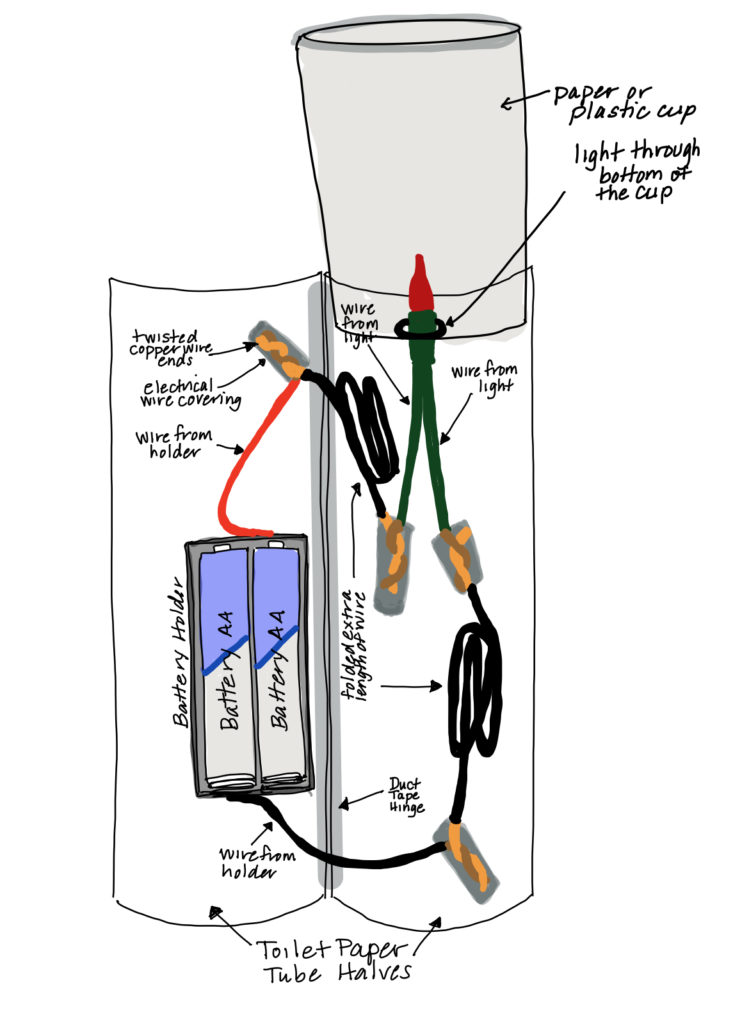
- Make the tube assembly second.
- Cut the tube in half. Use duct tape to create a hinge on one side of the tube so that you can open and close the tube. Putting duct tape on the inside and outside will prevent the tube from coming apart later. You can use a small piece of duct tape to hold the other side closed, but still allow you to open the tube when you need to.
- Open the tube so that it looks like the blueprint. Use a marker to draw the lines for the circuit inside the tube. This will make it easier to arrange the wires, battery holder and light bulb when you do your final assembly.
- Optional: Decorate the outside of the tube with construction paper or other materials you may have at home.
- Put the circuit into the tube.
- Use the lines you have drawn in the cardboard tube to arrange your circuit.
- Use duct tape to secure the battery holder in one side of the tube.
- Tape down the wires in the toilet paper tube as shown in the diagram.
- The light bulb will need to be in the center of the tube, so do not tape it directly on the toilet paper tube.
- Open and close the tube so that you know that the circuit will not fall apart.
- Add the cup to direct the light.
- Punch a hole in the bottom of the cup with a pen or pencil. If you are using a plastic cup, be slow and gentle so that you do not split the cup. Make the hole large enough that the light bulb will extend through and will be held in place by the cup.
- If it fits, put the bottom of the cup inside the plastic tube and secure it in place with duct tape.
- If the cup does not fit inside the tube, secure the cup at the top of the tube with duct tape.
- Make sure that the tube will open and close. You may have to trim the cup or the tube so that it fits smoothly.
- Optional: You may choose to line the inside of the cup with foil to magnify the intensity of the light.
NOW.. Put the batteries in the battery holder and see if your flashlight works!!
POST PICTURES OF YOUR WORKING FLASHLIGHT ON THE FACEBOOK PAGE TO SHARE!
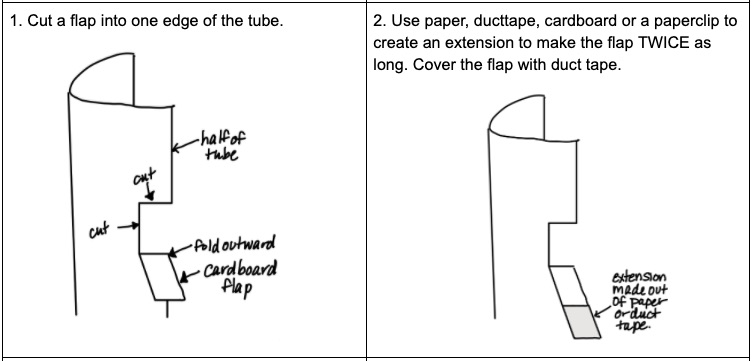
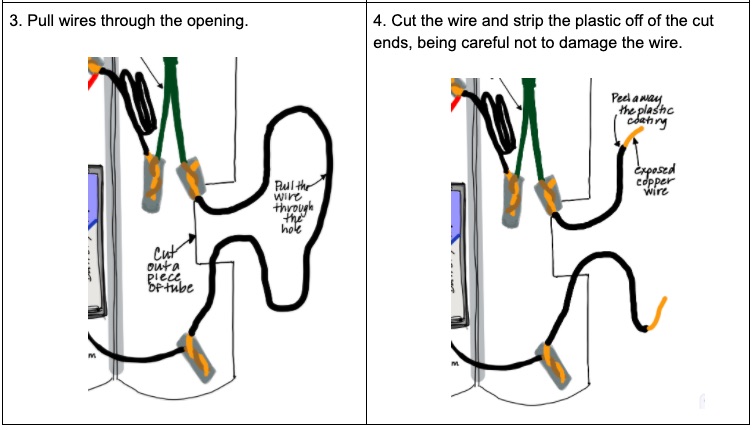
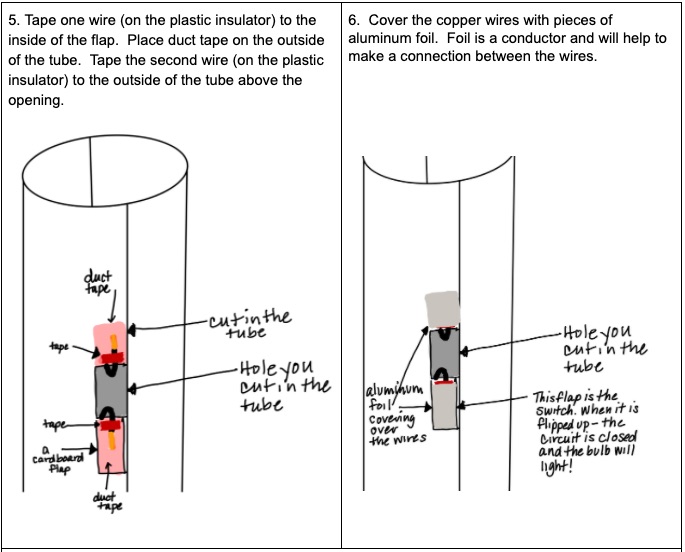
Part C: EXTEND YOUR DESIGN: Making a switch for your flashlight
What is a switch?
A switch is a component which controls the open-ness or closed-ness of an electric circuit. A switch is an important component in our flashlight circuit because it will allow us to turn the flashlight on and off without having to open the flashlight to insert or remove the batteries. You can use our simple design OR make your own!!!
Here’s what you will share:
2 copper brads
Paper clips
Electrical tape
Aluminum foil
Roll of electrical tape
Duct tape
Scissors
Utility knife (ADULT USE ONLY)