

Materials
What you need for FRIDAY:
For each camper:
Tall Pringles can
Wooden Skewer
Gloves to protect your hands
To share:
Thermometer
Scissors (utility knife-ADULTS only)
Tape and/or glue
Acetate and sheet protector
Aluminum foil
Black construction paper
White construction paper
Marshmallows
Gallon plastic bag
Quart plastic bag
4 cups ice
½ cup rock salt or ice cream salt
1 cup half & half or whole milk
Sugar (2 tbsp)
Vanilla (1tsp)
Introduction
Objectives:
To understand the difference between infrared (thermal) and visible light on the electromagnetic spectrum.
To explore the conversion of radiant (electrmagnetic) energy to thermal energy.
To engage in the engineering design cycle.
To utilize solar energy to cook marshmallows.
To use the changing states of matter and the properties of ice with salt to alter the freezing point of water.
Time Required:
Part 1: 45 minutes
Part 2: 45 minutes (+ time for testing)
Part 3: 30 minutes
These estimations may be longer depending on the age of campers and the intensity of your testing.
Remember to take pictures of your solar cooker designs so that you can share them!
Age Range:
Parts 1-3: Grades 3-5 with guidance; Grades 6-8 independent
Background Reading
Background Reading
Solar Cooker Background:
Excerpted from https://www.pcc.edu/about/events/sustainability-training/documents/solar-cooker.pdf
Did you know that for about one-third of the people in the world if they want a hot meal, then they must cook it over an open fire? The task of cooking for a household overwhelmingly falls on women, and if a hot meal is to be cooked over an open fire, then they need to purchase wood to burn. Many of these people have less than $1 per day to purchase what they need to take care of their households, and they must choose between buying firewood to use for heating homes or for cooking a hot meal. (Also, cooking with firewood can cause respiratory problems.) In addition, as of 2013, about 783 million people do not have access to clean water, so the water they do have access to needs to be heated to kill parasites and harmful bacteria.
Since firewood can be in short supply or too expensive for these people, how else might they be able to heat water to purify it or cook a hot meal? The answer is SOLAR COOKING!
Solar cookers can be used to provide hot meals and to pasteurize water (heat water to kill bacteria), and it does not produce anything harmful to people or to the planet, like fires can do. Using solar cookers, women and families can breathe cleaner air, have safe drinking water, and hot meals. Solar cookers also free up money and time and increase safety for women and their families, because they do not need to gather firewood. This means that they have more money and time for education, preparing goods to sell at the market, taking care of each other, and resting or relaxing.
How do solar cookers work?
Most solar cookers follow one basic principle: sunlight is converted to heat energy that is retained for cooking. Energy is never created or destroyed, it only changes “forms.” Infrared waves that reach a solar cooker are absorbed as thermal radiation by objects in the cooker. An object will either absorb light waves and convert a large part of them to heat, transmit light waves through itself, or reflect light waves off its surface. When light hits most objects, part of it will be absorbed, part transmitted, and part reflected.
In solar cooking, light energy is absorbed by a dark colored surface. This absorption excites the molecules of the dark surface. Excited molecules are hot molecules, because they are moving around—this means that they have a lot of kinetic energy. As the hot molecules lose kinetic energy and begin to slow down, they release heat into the food in the solar oven. Temperature is a measure of kinetic energy.
We will use a Pringles can to create a solar oven—we will capture solar energy (radiant energy) and convert it into thermal energy to cook a marshmallow.
Solar Cookers
There are three main types of solar cookers: box (solar oven) cookers, panel cookers, and parabolic cookers. Despite their differences, all three of these types of cookers operate on the same principle: they concentrate the Sun’s energy on the object to be heated.
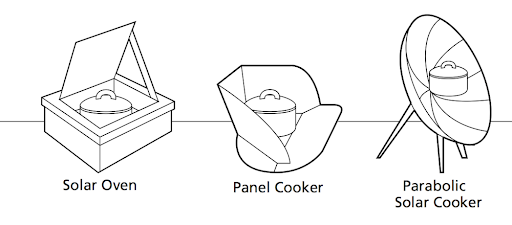
Box cookers (solar ovens) work by trapping energy inside the box. The box “lid” is usually covered by clear glass or plastic, which allows light waves to pass into the box but does not easily let infrared waves out of the box. In general, glass works better as a heat trap than plastic. If the interior of the box cooker is a dark color, then it will absorb more of the light waves. Insulating the box helps to prevent heat loss from the box and a reflective surface is added outside the box to help focus light waves inside.
Panel cookers work by reflecting light waves down onto the food to be cooked. They often contain many panels positioned to reflect light waves down onto the food.
Parabolic cookers similarly use a reflective surface to focus light. They are different from panel cookers in that they concentrate all incoming light waves to a specific point (called the focal point). The focused light waves are converted to heat when they are absorbed by the food. This design feature of parabolic cookers makes them very effective.
The Science of Making Ice Cream
Exerpted from Science in the City https://stanford.app.box.com/s/srtwm6rwd38x2j01d92cyqihr4ixvi48
To make ice cream, the ingredients—typically milk (or half and half), sugar and vanilla extract—need to be cooled down. One way to do this is by using salt. If you live in a cold climate, you may have seen trucks spreading salt and sand on the streets in the wintertime to prevent roads from getting slick after snow or ice. Why is this? The salt lowers the temperature at which water freezes, so with salt ice will melt even when the temperature is below the normal freezing point of water.
Technically, the temperature that the salt lowers is called the freezing point. When a freezing point is lowered, such as by adding salt to water, the process is called freezing-point depression. When the cream changes phases it will change from a liquid to a solid. However, because we will use salt to make this more difficult, the ice cream will stop before it freezes into a solid.
As we’ll see in this activity, freezing-point depression is not unique to solutions made of water and salt; it also happens with other solutions. (A solution is made when a substance, such as salt, is dissolved and becomes a solute. The medium into which it is dissolved is a solvent—typically a liquid, like water.) The secret to making ice cream is to lower the freezing point of ice so it can freeze the cream. How? The scientific secret is plain old salt!
Procedure
Part A: EXPLORE: Building a Basic Solar Cooker
Radiant energy from the sun can be reflected and concentrated on an object. A portion of the radiant energy absorbed by an object is in the form of thermal energy (heat). This is an energy conversion: radiant energy to thermal energy. Radiant energy can pass through clear materials much easier than thermal energy can. The flaps on the Pringles can will be used to reflect radiant energy onto the marshmallow, thus concentrating the amount of energy that will be converted into heat. When positioning the flaps on the can to reflect the maximum amount of radiant energy onto the marshmallow.
Materials:
Here’s what each camper will need:
Tall Pringles can
Wooden Skewer
Here’s what the campers can share:
Thermometer
Nail & Scissors (utility knife-ADULTS only)
Marshmallow
Basic Procedure:
- Open the Pringles can and remove the chips.
- If you have a hammer, have an adult help you to use a hammer and nail to punch a hole in the center of the bottom of the can as shown in the diagram. OR If you do not have a hammer, have an adult help you to use the nail to dent the center of the can. Carefully push and twist the nail until you have created a hole in the can. You may need to move the nail around to make the hole big enough so that the wooden skewer is able to fit through it.
- Measure and mark the can as shown in the diagram below. Have an adult help you to cut your marks on the Pringles can. They will need to use the utility knife to carefully cut the can.
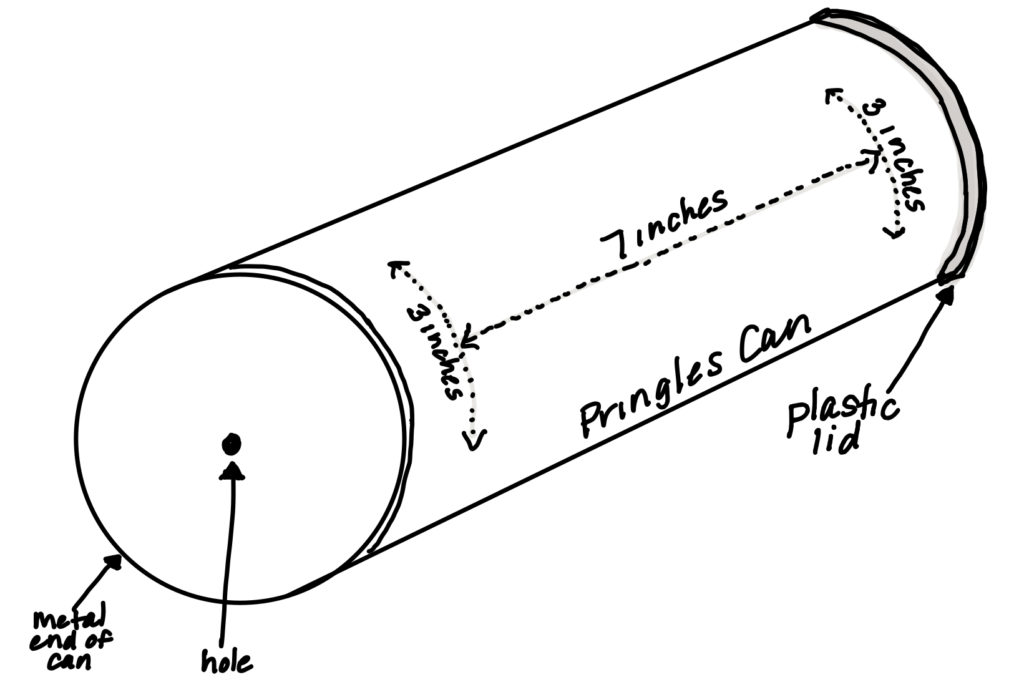
- Bend back the flaps, but do not remove them from the can.
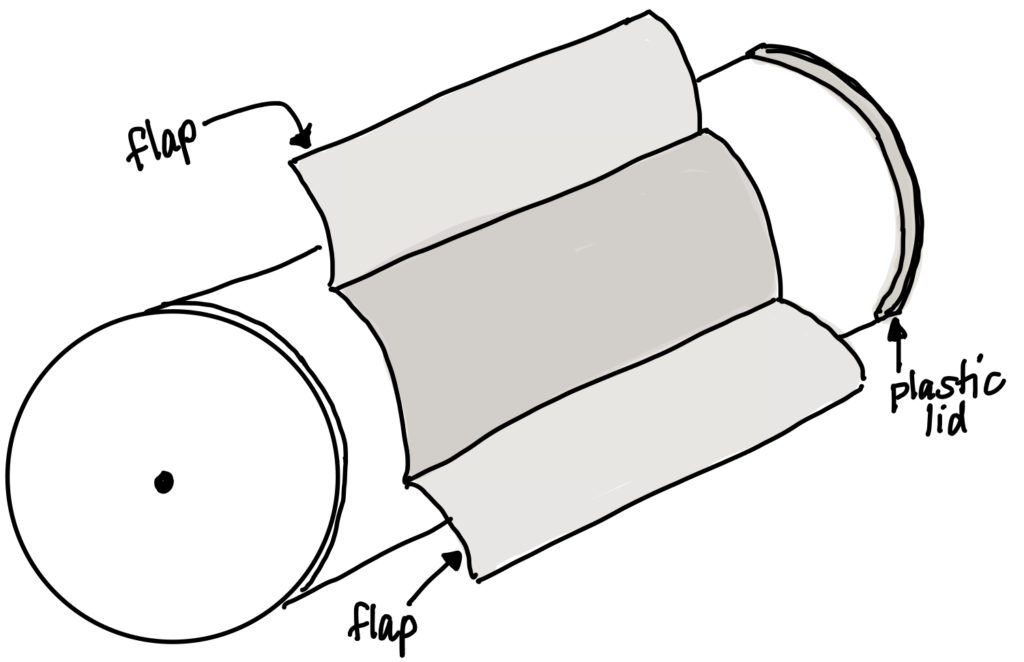
- Remove the plastic lid from the can. Place the skewer through the plastic lid. Put the plastic lid back onto the can, adjusting so the skewer reaches the hole in the metal end of the can. Push the skewer so that it is secured through the hole in the metal end of the can. The marshmallow should be suspended inside the can.
- Take the temperature of the solar cooker before you start cooking. Record the starting temperature on your data chart.
- Place the solar cooker in direct sunlight, positioning the flaps to reflect the maximum amount of radiant energy onto the marshmallow.
- At the end of cooking, take the temperature again and record the temperature. Record the amount of time required to cook the marshmallow.

Part B: REDESIGN: Improving your Solar Cooker
In order to cook using sunlight, we need to transform the radiant energy of sunlight into thermal energy. Thermal energy is heat. It is the internal energy of substances. It is caused by the vibration and movement of atoms and molecules within substances. The faster the molecules in a substance move or vibrate, the more thermal energy is in that substance.
Successful solar cookers must have a large area of reflecting surface to focus light waves. All cookers are most effective if:
- they directly face the sun (or are at least at a 45-degree angle to the sun to catch incoming energy)
- when their reflective material is as smooth as possible.
- when the user is able to change the angle of reflection so that it hits the food more directly.
- thermal heat is contained inside the cooker.
- when the cooking container is a dark color.
- when the cooker is only a bit larger than the food it holds.
Here’s what the campers can share:
Thermometer
Marshmallows
Tape and/or glue
Acetate and sheet protector
Aluminum foil
Black construction paper
White construction paper
USE YOUR MATERIALS TO PLAN SOME CHANGES:
- Look at the basic solar cooker that you built. What types of improvements can you make to make it more effective? Use your additional materials to make changes to the basic design.
- How can you better direct the light to your marshmallow?
- How can you direct MORE light to your marshmallow?
- How can you allow light to enter but trap the heat inside the can?
- Is your can the appropriate size for the marshmallow? How can you adjust the size of the internal cooking area WITHOUT changing the size of the can?
- How can the rest of the can absorb heat, even if light cannot enter?
TEST YOUR REDESIGN:
- Remove the plastic lid from the can. Place the skewer through the plastic lid. Put the plastic lid back onto the can, adjusting so the skewer reaches the hole in the metal end of the can. Push the skewer so that it is secured through the hole in the metal end of the can. The marshmallow should be suspended inside the can as in the diagram.
- Take the temperature of the solar cooker before you start cooking. Record the starting temperature on your data chart.
- Place the solar cooker in direct sunlight, positioning the flaps to reflect the maximum amount of radiant energy onto the marshmallow.
- Take the temperature again at the end of cooking. Record the amount of time required to cook the marshmallow.
- Did your cooking time and cooking temperature improve?
PART C: FOOD SCIENCE: Ice Cream After Phase Change
Ice cream is delicious, but it is also a really cool example of phase change. Technically, the temperature that the salt lowers is called the freezing point. When a freezing point is lowered, such as by adding salt to water, the process is called freezing-point depression. When the cream changes phases it will change from a liquid to a solid.
However, because we will use salt to make this more difficult, the ice cream will stop before it freezes into a solid. As we’ll see in this activity, freezing-point depression is not unique to solutions made of water and salt; it also happens with other solutions. (A solution is made when a substance, such as salt, is dissolved and becomes a solute. The medium into which it is dissolved is a solvent—typically a liquid, like water.) . The secret to making ice cream is to lower the freezing point of ice so it can freeze the cream. How? The scientific secret is plain old salt!
If you are lactose intolerant — Coconut milk and lactose-free milk can be used to replace the half & half. Be patient though.. it might a little longer to freeze! Why do you think that might be?
Materials:
Here’s what each camper will need:
Gloves to protect your hands
Here’s what the campers can share:
Thermometer
Gallon plastic bag
Quart plastic bag
4 cups ice
½ cup rock salt or ice cream salt
1 cup of half & half (or whole milk) per serving
Sugar (2 tbsp) per serving
Vanilla (1tsp) per serving
Basic Procedure:
- Pour half & half (or milk), vanilla and sugar into a quart-sized zip-top bag for each serving.
- Squeeze out air and seal the bag tightly. Place inside the second quart-sized bag and seal.
- Place the double-bagged ingredients inside the gallon-sized freezer bag. Fill the freezer bag with ice, pour in the rock salt, squeeze of air and seal. Use the thermometer to take a temperature reading of the milk mixture. Record the temperature on the temperature graph.
- Put on your gloves to protect your hands.
- Gently shake the bag, making sure the ice is evenly spread out. Continue to shake and knead the bag in your hands. If you have secured the bags well, you can toss your ice-cream making package back and forth. Put on some music and enjoy the time.
- After 3 minutes, carefully open the bags and take the temperature of the ice mixture. Record the temperature on the temperature graph.
- Continue shaking and tossing the bag. Test the temperature every three minutes and record on the graph. Continue until the ice cream should be solid and ready to eat. This should take about 10-15 minutes. The ice cream will be in a solid phase.
- Distribute the ice cream in small cups and ENJOY!
Optional Experimentation:
Part 3 was designed to use some kitchen chemistry for fun, but if you would like to be more experimental with your ice cream, design your own experiment! Some suggestions are below:
- Test different concentrations of salt – Does it affect the freezing time of the ice cream? What does this tell us about the effect of salt on freezing point?
- Test different types of milk (heavy cream, half & half, whole, 2% or skim)- Which freezes the fastest? What is the texture of the ice cream made by the different types of milk?